Leveraging Redshift’s scalable data storage and querying capabilities for your Braze data presents multiple benefits. You can unlock new opportunities to enhance consumer understanding, refine marketing strategies, and drive revenue growth.
Integrating Braze to Redshift facilitates a streamlined data flow and enables real-time analytics that adapt to rapidly changing market conditions and consumer preferences. You can also tailor personalized marketing campaigns that can significantly improve engagement rates and customer loyalty.
This article will explore the different methods of integrating Braze with Redshift. But first, let’s start with a quick overview of each platform!
Braze – The Data Source
Braze, formerly known as Appboy, is a consumer engagement tool that helps companies create customized and targeted marketing campaigns across various media. With Braze, you can listen to your consumers, decipher behavioral signals, and deliver timely, relevant messages through optimal communication channels such as social media, SMS, and emails.
Some key features of Braze include:
- Cross-Channel Engagement: Braze facilitates personalized communication via email, push notifications, in-app messages, and SMS. This multi-channel strategy captures user interactions across several touchpoints, giving a comprehensive view of consumer behavior.
- Segmenting Customers: You may segment your Braze user base by behavior, demographics, and in-app activities. This enables the creation of targeted ads that appeal to particular user groups, enhancing engagement and boosting conversion rates.
- Management of User Lifecycle: Braze supports your customers throughout their lifecycle, from onboarding new customers to re-engaging dormant ones. It continuously monitors user activities at each stage, delivering valuable insights to drive user acquisition, improve retention, and reduce churn.
- Event Tracking: You can track standard user activities and capture detailed in-app events. This helps you better understand how users engage with your app, identify areas for improvement, and customize the user experience.
Redshift – The Destination
Amazon Redshift is a fully managed, cloud-based, petabyte-scale data warehousing service designed to handle large-scale data processing and analytics. You can use SQL queries in Redshift to analyze massive and complex workloads. This makes it a renowned platform for data warehousing and business intelligence.
With Amazon Redshift Serverless, you can also scale resources up or down based on workload since it automatically manages the data warehouse capacity. This helps overcome the complexity of a typical warehouse setup, making data access and analysis easier. The dynamic scaling optimizes resource usage and reduces expenses while delivering rapid performance across diverse workloads.
Redshift’s pay-per-query pricing model ensures that you incur charges only for queries you run, making it a cost-effective solution for organizations seeking streamlined analytics without compromising performance.
Here are some key features of Redshift.
- Compression: Redshift implements automatic compression to enhance performance and reduce the data size. This helps minimize storage costs and improve query speed by reducing the amount of data that must be scanned.
- Expansion: Redshift supports massively parallel processing (MPP), allowing you to scale horizontally by adding more nodes. This is especially crucial for efficiently handling increased data volumes and complex queries.
- User-Defined Functions (UDFs): Redshift allows you to create your own functions in SQL or Python for tailored data processing, enabling customized data manipulation and analysis.
- Security: Redshift provides robust security by encrypting data at rest and in transit, using industry-standard encryption methods. This helps ensure data security and confidentiality.
How to Integrate Braze to Redshift
Let’s look at the best ways you can use to load data from Braze to Redshift.
- Method 1: Using Estuary Flow to Integrate Braze to Redshift
- Method 2: Using Braze Cloud Data Ingestion (CDI) to Integrate Braze to Redshift
- Method 3: Using CSV Export/Import to Load Data from Braze to Redshift.
Method 1: Using Estuary Flow for Braze to Redshift Integration
Estuary Flow is an effective tool for real-time data integration that gives you access to several pre-built connectors for data movement. With its no-code configuration, many-to-many connectors, and user-friendly interface, Flow is a great option for your diverse data integration needs.
Let’s dive into the steps in using Estuary Flow to integrate Braze to Redshift.
Prerequisites
Before you get started, here are some of the prerequisites:
Step 1: Configure Braze as a Source
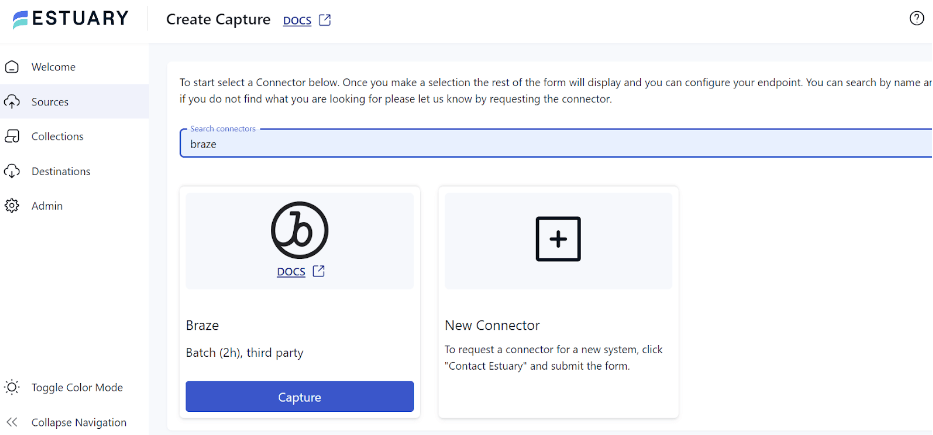
- Sign in to your Estuary account and select the Sources option on the dashboard.
- On the Sources page, click the + NEW CAPTURE button.
- In the Search connectors box, type Braze.
- When you see the Braze connector in the search results, click its Capture button.
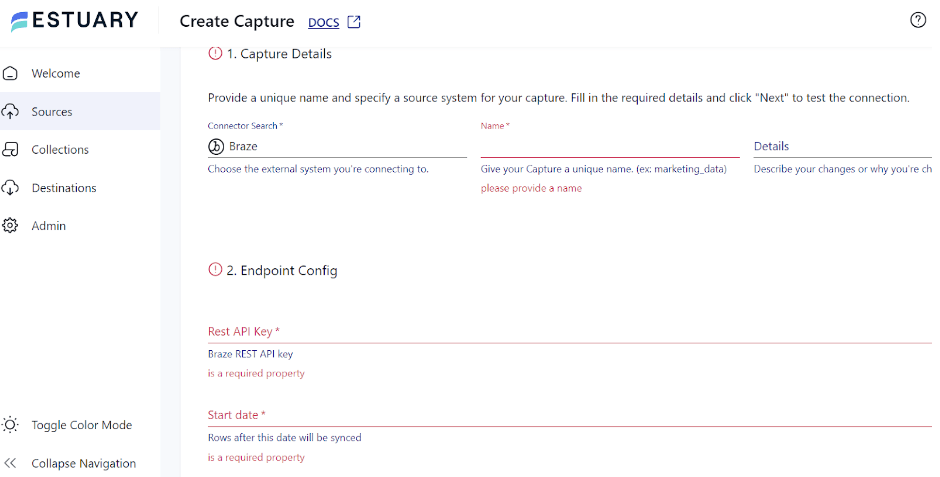
- On the Braze connector configuration page, enter the necessary details, including a Name, Start date, URL, and Rest API Key.
- Click NEXT > SAVE AND PUBLISH. The connector will capture your Braze data into Flow collections.
Step 2: Configure Redshift as the Destination
- After you’re done configuring Braze as the source end of the data pipeline, the next step is to configure Redshift as the destination end. To start this process, navigate to the Estuary dashboard and select the Destinations option.
- On the Destinations page, click on the + NEW MATERIALIZATION button.
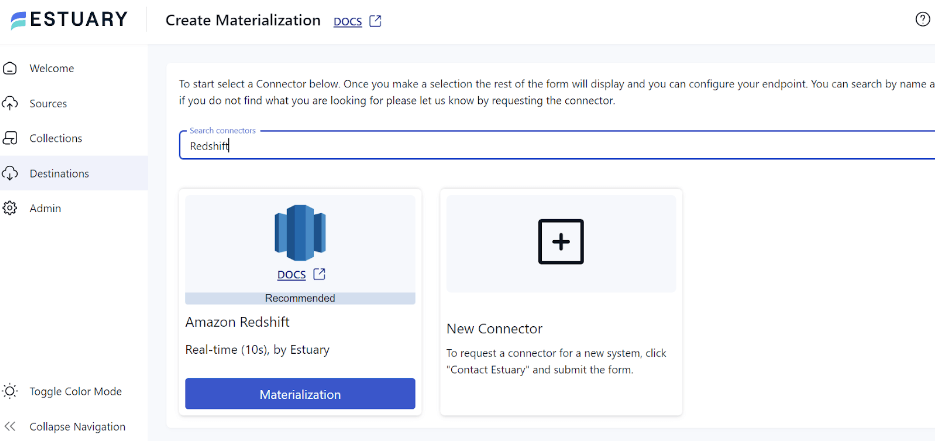
- Enter Redshift in the Search connectors field and click the connector’s Materialization button when it appears in the search results.
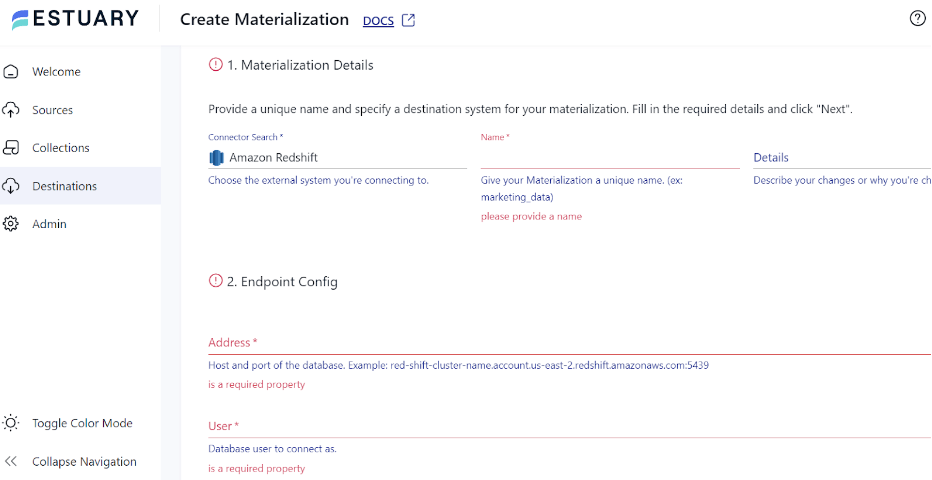
- On the Redshift Create Materialization page, enter the required information, such as a Name, Address, User, and Password, among other fields.
- Consider using the Source Collections section to manually link a capture to your materialization.
- Click NEXT > SAVE AND PUBLISH. The connector will materialize Flow collections of your Braze data into tables in Redshift.
Benefits of Using Estuary Flow
- Wide Range of Connectors: Estuary Flow has more than 300 pre-built connectors. Without writing a single line of code, you can easily configure these connectors to integrate data from multiple sources to the destination of your choice.
- Real-time Data Processing: Flow supports continuous real-time Data Flow from Braze to Redshift. This makes it possible for downstream apps to use the most recent data, allowing real-time decision-making.
- Ease of Use: This allows users to quickly set up Data Flows, linking various systems in a matter of minutes. Furthermore, engineers have the flexibility to fine-tune these data flows, perform troubleshooting, and set up intricate transformations using their preferred tools. This dual-faceted approach makes Estuary Flow a versatile platform that is user-friendly for both non-technical and technical users.
- Change Data Capture (CDC): This helps ensure the accuracy of data. Estuary Flow CDC pipelines only record the most recent modifications made to the source data since the last capture, guaranteeing that the data you are working with is the latest data.
Method 2: Using Braze Cloud Data Ingestion (CDI) to Integrate Braze to Redshift
Braze Cloud Data Ingestion (CDI) allows direct synchronization of relevant user or catalog data with Braze. CDI's adaptable integration supports complex data structures, such as arrays of objects and nested JSON.
Prerequisites
- Ensure Braze has the necessary permissions to access the Redshift tables you wish to synchronize.
- Set up the table or view within your Redshift instance that you want to sync with Braze.
- On the Braze dashboard, prepare to create a new integration.
Step 1: Configure Views or Tables in Redshift
To configure views or tables in Redshift, follow these steps:
1. Arrange the Table
- Create a new database and schema to save your source table.
plaintextCREATE DATABASE BRAZE_CLOUD_PRODUCTION;
CREATE SCHEMA BRAZE_CLOUD_PRODUCTION.INGESTION;- Create a table (or view) for the CDI integration. Here’s a sample code to do this:
plaintextCREATE TABLE BRAZE_CLOUD_PRODUCTION.INGESTION.USERS_ATTRIBUTES_SYNC (
 updated_at timestamptz default sysdate,

   external_id varchar,
   alias_label varchar,
   alias_name varchar,
   braze_id varchar,
   email varchar,
   phone varchar,
   payload varchar(max)
)- Provide your choice of name for the table, schema, and database; the column names need to match the previous definition.
2. Add a user and Grant Access
Here’s a sample code to create a user and grant access permissions:
plaintextCREATE USER braze_user PASSWORD '{password}';
GRANT USAGE ON SCHEMA BRAZE_CLOUD_PRODUCTION.INGESTION to braze_user;
GRANT SELECT ON TABLE USERS_ATTRIBUTES_SYNC TO braze_user;
These are the minimum required user permissions. When developing numerous CDI integrations, you might want to use a group to manage access or provide permissions to a schema.
3. Allow Access to Braze IPs
Grant Braze network access to your Redshift instance if you have firewalls or other network controls in place.
Step 2: Create a New Integration
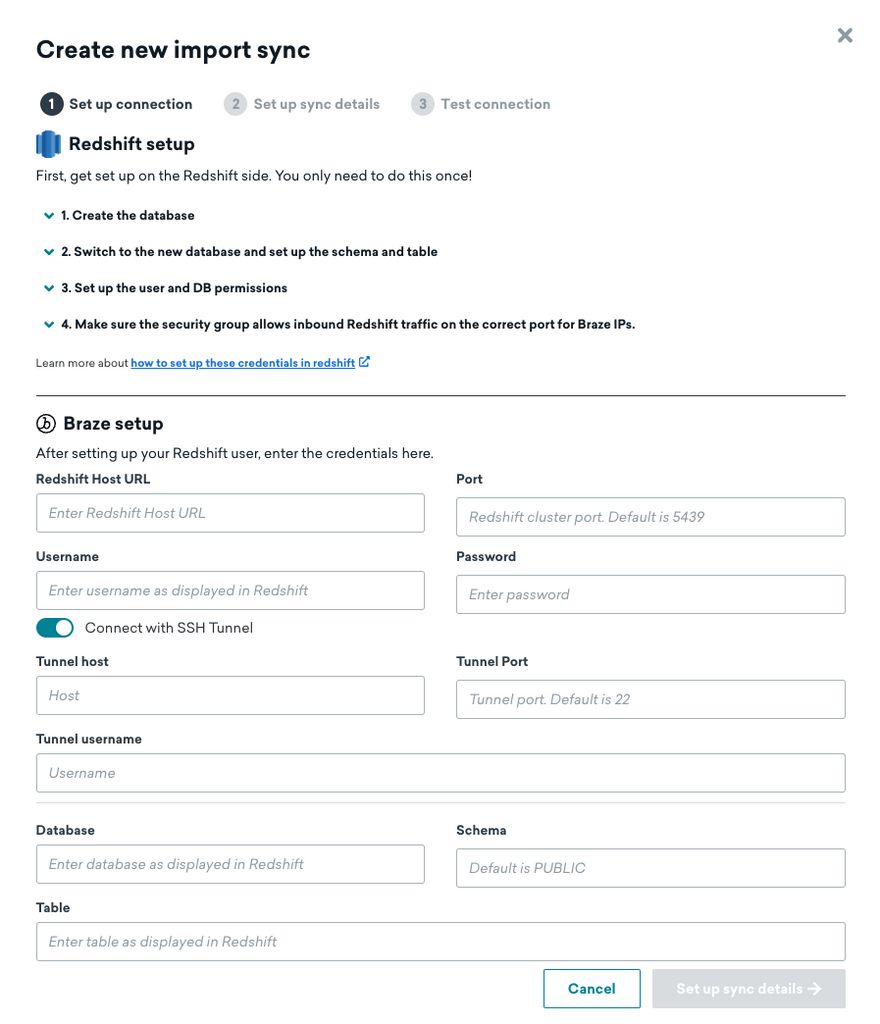
On the Braze dashboard, navigate Partner Integrations > Technology Partners. Locate the Redshift page and click Create new import sync.
1. Add Redshift Connection Information and Source Table
- Enter the user credentials for your Redshift data warehouse and the details of the source table. If you're using a private network tunnel, toggle the slider and enter the tunnel details.
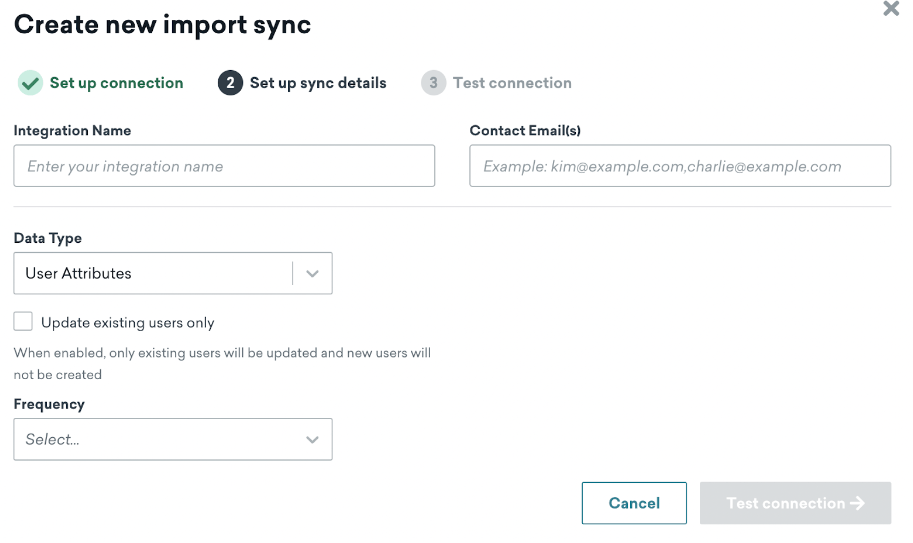
2. Setup the Sync Information
- Next, enter the input contact emails and choose a name for your sync.
Step 3: Verify the Connection
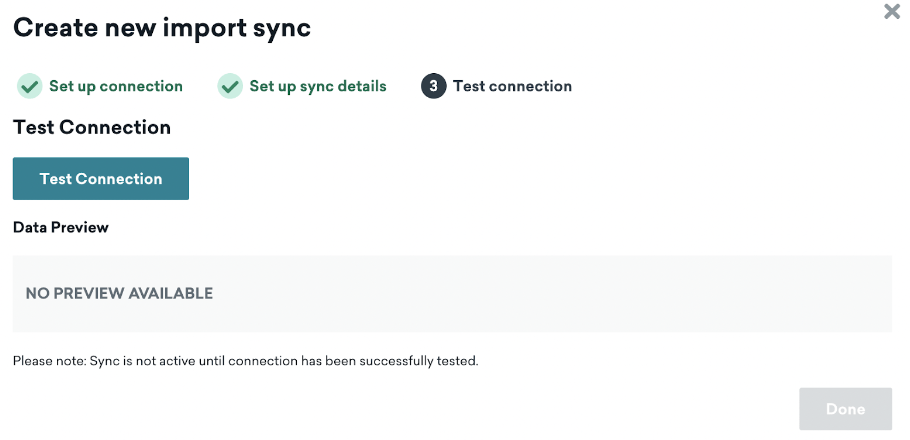
Navigate back to the Braze dashboard and click Test Connection. If successful, you’ll see a data preview.
Limitations of Using Braze Cloud Data Ingestion (CDI) to Integrate Braze to Redshift
- Data Structure: Your Redshift table can have up to 250 attributes in each row and can only have one user ID and one JSON object. Having a lot of user attributes could make it difficult to query and manage your data efficiently.
- Single Source Per Table: Braze Cloud Data Ingestion (CDI) only supports integrating data from a single source per table in Redshift. This restricts your flexibility in integrating multiple data streams or performing comprehensive analytics requiring data from various sources in Redshift.
- Limited Data Types: CDI offers only limited support for various data types. This results in data transformation errors and potential data loss when dealing with complex or non-standard data types.
Method 3: Using CSV Export/Import to Load Data From Braze to Redshift
This approach involves exporting data from Braze as CSV files and then loading CSV into Redshift. Let's look at the detailed steps in this method.
Step 1: Export Data as CSV Files
Braze lets you export your data in CSV format. For this example, we will consider exporting Campaign data from Braze to a CSV file. The steps for this are as follows:
- Log in to your Braze Account.
- In the Campaign Details section, click the User Data button for the campaign you want to export data from.
- The CSV output will include each campaign recipient’s user profile data. Braze will create the report and send it to the email address associated with your Braze account.
If your Braze account is configured to connect with your Amazon S3, the CSV file will also be uploaded to your S3 bucket automatically.
Step 2: Load CSV Files into Redshift Using Amazon S3 Bucket
Using an S3 bucket is one of the easiest ways to import CSV files into Amazon Redshift. Here are the steps involved:
- If required, gzip your CSV files to reduce file size and speed up the upload process.
- Create a manifest file if you’re loading multiple files or need specific control of the load process. This file will list the paths to the CSV files in S3 for Redshift to import.
- Place your CSV files and manifest file into your S3 bucket.
- Use the COPY command to load data to the specified table. If you’re using gzipped files and a manifest, your command will have the following structure:
plaintextCOPY <schema-name>.<table-name> (<ordered-list-of-columns>) FROM '<manifest-file-s3-url>'

CREDENTIALS 'aws_access_key_id=<key>;aws_secret_access_key=<secret-key>' GZIP MANIFEST;- For a simple CSV file upload, especially when skipping headers, you can use the following command:
plaintextCOPY table_name (col1, col2, col3, col4)
FROM 's3://<your-bucket-name>/load/file_name.csv'
credentials 'aws_access_key_id=<Your-Access-Key-ID>;aws_secret_access_key=<Your-Secret-Access-Key>'
CSV;

-- Ignore the first line
COPY table_name (col1, col2, col3, col4)
FROM 's3://<your-bucket-name>/load/file_name.csv'
credentials 'aws_access_key_id=<Your-Access-Key-ID>;aws_secret_access_key=<Your-Secret-Access-Key>'
CSV
INGOREHEADER 1;
This SQL code snippet uses the supplied column names and AWS credentials to copy data from a CSV file in an S3 bucket to a designated table. For data consistency, it also has the option to disregard the CSV file’s initial line.
Conclusion
Integrating Braze with Redshift helps businesses combine their customer engagement data and take advantage of Redshift’s sophisticated analytics features to gain practical insights. You can improve operational efficiency by loading your rich, real-time customer data from Braze to Redshift’s scalable data warehouse. With a better understanding of your clients’ interactions, preferences, and behavior across several channels, you can work on tailored strategies.
Manual integration is appropriate for businesses with specialized data needs or custom workflows since it gives them control over the integration process. However, there are challenges to consider – such as complex scripts and incompatible data types.
Estuary Flow lets you minimize downtime and optimize the integration process by means of automation. This allows you to easily reduce errors and manual labor as you transfer your Braze data to Amazon Redshift in near real-time.
Are you considering integrating data from various sources into a single location? With more than 300 connectors, Estuary Flow can assist you effortlessly in accomplishing this. Register now to start creating effective ETL data pipelines!
FAQs
How can I ensure data accuracy and consistency when integrating Braze with Redshift?
You can ensure accuracy and consistency of your data by implementing data validation checks, and inspecting your data pipelines on a regular basis.
How can I troubleshoot integration issues between Braze and Redshift?
Examining error logs, confirming data synchronization procedures, and examining data mappings are the first steps in diagnosing integration problems. Additionally, use the help resources offered by Redshift and Braze and communicate with IT specialists or contact the vendor’s support staff for assistance.

Author
Popular Articles


