PostgreSQL, a world-class relational database management system, has rightfully earned its reputation as one of the most advanced and versatile platforms. With a market share of over 8%, PostgreSQL stands tall as a true powerhouse among RDBMS. But do you know the major reason for its acclaim? It's the PostgreSQL Trigger!
These triggers are little vigilantes that let you automate actions, keep data integrity in check, and respond to events happening right within the database environment. However, as with any coding adventure, PostgreSQL triggers come with their share of trouble. Creating and managing them can sometimes cause syntax errors that make your database misbehave.
No need to worry — we're here to guide you through creating, replacing, and managing PostgreSQL triggers, all while avoiding syntax errors.
PostgreSQL Triggers: What Are They and How Do They Work?
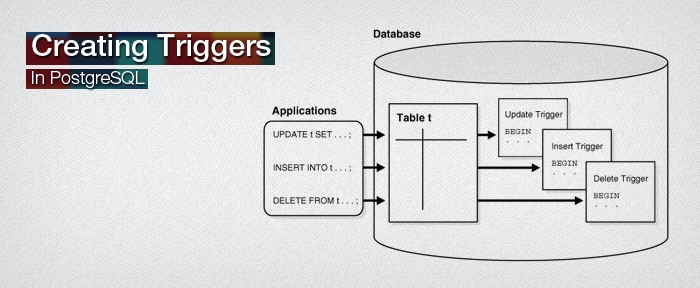
PostgreSQL triggers are specialized user-defined functions that are activated automatically when a specified event related to a table occurs. These triggers are closely associated with a table and act as an automated response to specified changes or events.
Events that can fire a trigger include:
- INSERT: Adding new data to the table.
- UPDATE: Modifying existing data in the table.
- DELETE: Removing data from the table.
- TRUNCATE: Removing all data from the table at once.
PostgreSQL triggers are super handy when different applications access the database and you want to automate certain operations within that database. The benefits of using triggers include:
Benefits of Using PostgreSQL Triggers
- Maintaining history: Triggers keep track of data history without the application having to monitor every event like INSERT or UPDATE.
- Enforcing data integrity rules: A constraint trigger specifies a specific set of rules that governs the data flow and prevents incorrect or potentially harmful data from getting added to the database. These constraint triggers are similar to regular triggers but more flexible as they let you adjust the timing of their firing using SET CONSTRAINTS.
However, there’s a catch with triggers: you should be aware of their existence and understand their logic to see the effects when data changes. This means you should know multiple triggers that exist and interact with one another.
Types Of PostgreSQL Triggers
In PostgreSQL, triggers are categorized into 2 main types:
Row-Level Triggers
These are initiated once for each row affected by the triggering event. For instance, if an UPDATE statement modifies 20 rows, a row-level trigger would be activated 20 times.
Statement-Level Triggers
These are invoked once for each transaction regardless of how many rows are affected. Using the same example, a statement-level trigger would only be activated once.
Unique Features of PostgreSQL Triggers
While PostgreSQL follows the SQL standard, its triggers have some unique features. Let’s take a look:
- PostgreSQL can fire triggers for the TRUNCATE event.
- Statement-level triggers can be defined on views in PostgreSQL.
- Unlike the SQL standard that can use any SQL commands, PostgreSQL needs a user-defined function to be set as the trigger action.
These specific characteristics enhance the flexibility and versatility of PostgreSQL triggers in managing database operations.
How to Create or Replace PostgreSQL Triggers: Step-by-Step Guide
Creating or replacing a trigger in PostgreSQL involves 2 main steps:
Step 1. Create Or Replace Trigger Function Syntax
The trigger function contains the logic that will execute when the trigger is activated. Using the ‘CREATE OR REPLACE FUNCTION’ statement, we can either create a new trigger function or replace an existing one with the same name. This is useful if we need to update the logic within the function.
The syntax for creating a trigger function is pretty straightforward. It does not take any arguments but returns a value with the type ‘TRIGGER’. Here's an example:
plaintextCREATE OR REPLACE FUNCTION trigger_function()
   RETURNS TRIGGER
   LANGUAGE PLPGSQL
AS $$
BEGIN
   -- -- trigger logic, this can include an insert trigger
END;
$$
In this syntax:
- ‘CREATE OR REPLACE FUNCTION’ is the statement that tells PostgreSQL to create a new function or replace an existing one.
- ‘trigger_function()’ is the name of the function you want to create or replace.
- ‘RETURNS TRIGGER’ indicates that this function is intended to be used as a trigger.
- ‘LANGUAGE PLPGSQL’ indicates the programming language of the function which is PL/pgSQL in this case. PostgreSQL supports several other languages as well.
- The ‘BEGIN...END’ block is where you place your trigger logic, i.e., what you want the function to do when the trigger is activated.
Step 2. Associate the Trigger With a Table
Once we have defined our trigger function, we need to associate it with a specific table using the CREATE TRIGGER command. This tells PostgreSQL that the trigger function will execute when specific events (such as data insertion, update, or deletion) happen on the associated table.
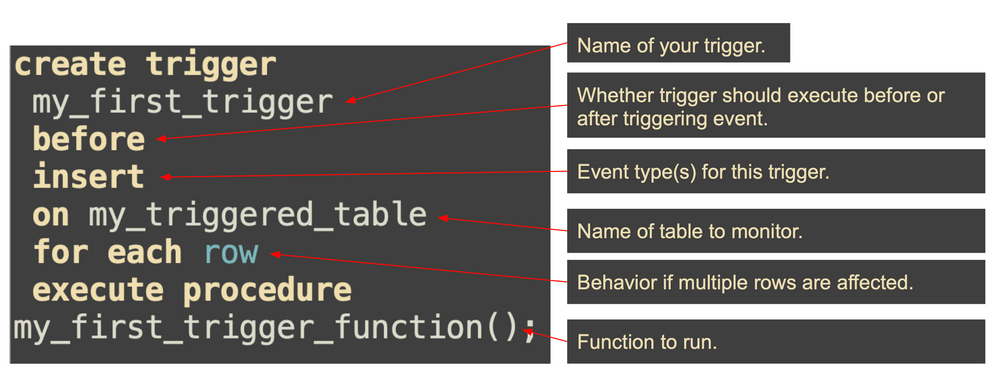
The CREATE TRIGGER statement forms a new trigger. Here is its basic syntax:
plaintextCREATE TRIGGER trigger_name
   {BEFORE | AFTER} { event }
   ON table_name
   [FOR [EACH] { ROW | STATEMENT }]
       EXECUTE PROCEDURE trigger_function
The syntax includes:
- ‘CREATE TRIGGER’ is the statement to create a new trigger.
- ‘trigger_name’ is the name of the trigger you want to create.
- ‘{BEFORE | AFTER}’ specifies when the trigger should fire. It can be before or after the event. They are normally called before trigger and after trigger.
- ‘{ event }’ is the event that will fire the trigger. It can be INSERT, UPDATE, or DELETE.
- ‘ON table_name’ specifies the table that the trigger is associated with.
- ‘FOR [EACH] { ROW | STATEMENT }’ specifies whether the trigger is row-level (fires once for each row affected) or statement-level (fires once for each triggering SQL statement).
- ‘EXECUTE PROCEDURE trigger_function’ is the trigger function that will be executed when the trigger is fired.
PostgreSQL Triggers Example: CREATE TRIGGER Explained
Let’s consider an example where we maintain an audit trail for a product table. We’ll create a trigger that records changes made to the product prices.
Create Products & product_price_changes Tables
This step creates 2 tables in the database. The first is the ‘products’ table, which will hold the details of the products such as their ‘id’, ‘name’, and ‘price’.
plaintextDROP TABLE IF EXISTS products;

CREATE TABLE products(
   id INT GENERATED ALWAYS AS IDENTITY,
   name VARCHAR(100) NOT NULL,
   price NUMERIC(10,2) NOT NULL,
   PRIMARY KEY(id)
);
The second table is ‘product_price_changes’ which will track changes in the prices of the products. For each change, it will store an ‘id’ for the change record, the ‘product_id’ (which is the id of the product in the ‘products’ table), the ‘old_price’, the ‘new_price’, and the timestamp ‘changed_on’ when the change happened.
plaintextDROP TABLE IF EXISTS product_price_changes;

CREATE TABLE product_price_changes (
   id INT GENERATED ALWAYS AS IDENTITY,
   product_id INT NOT NULL,
   old_price NUMERIC(10,2) NOT NULL,
   new_price NUMERIC(10,2) NOT NULL,
   changed_on TIMESTAMP(6) NOT NULL
);
Create a Trigger Function
This is where we create a function statement named ‘log_price_changes’. This function will be invoked each time an update operation happens on the ‘products’ table.
plaintextCREATE OR REPLACE FUNCTION log_price_changes()
  RETURNS TRIGGER
  LANGUAGE PLPGSQL
  AS
$$
BEGIN
IF NEW.price <> OLD.price THEN
INSERT INTO product_price_changes(product_id,old_price,new_price,changed_on)
VALUES(OLD.id,OLD.price,NEW.price,now());
END IF;

RETURN NEW;
END;
$$
Inside the function, we have a conditional check that compares the new price (‘NEW.price’) with the old price (‘OLD.price’). If they are not equal, it means that the price of the product has changed. In this case, an entry is inserted into the ‘product_price_changes’ table, recording the id of the product, the old price, the new price, and the current timestamp.
Bind the Trigger Function To The Products Table
In this step, the trigger ‘price_changes’ is created and bound to the ‘products’ table. The trigger is set to fire ‘BEFORE UPDATE’ on each row in the ‘products’ table. The trigger calls the ‘log_price_changes()’ function which we defined earlier.
plaintextCREATE TRIGGER price_changes
  BEFORE UPDATE
  ON products
  FOR EACH ROW
  EXECUTE PROCEDURE log_price_changes();
This means that before an update operation is performed on any row of the ‘products’ table, our trigger function will execute and check if the price of the product has changed. If the price changes, it logs the change in the ‘product_price_changes’ table.
Test The Trigger
We will insert some test data into the ‘products’ table, update a product's price, and then check the ‘product_price_changes’ table to verify that the trigger logged the change.
plaintext-- insert a product
INSERT INTO products (name, price) VALUES ('Product 1', 10.0);

-- update the product's price
UPDATE products SET price = 20.0 WHERE id = 1;

-- check the log
SELECT * FROM product_price_changes;
This will show you the change in price for the product, confirming that the trigger is working as expected as shown below:
Dropping PostgreSQL Triggers
The Drop Trigger Statement is a command that’s used when you need to delete or remove a trigger from the database system. This can be done when a trigger is no longer necessary or needs to be replaced. Dropping a trigger will not affect the data in the table but will cease the automatic operations the trigger was designed to perform.
plaintextDROP TRIGGER [ IF EXISTS ] trigger_name
ON table_name [ CASCADE | RESTRICT ]
In this syntax:
- ‘IF EXISTS’ is an optional clause that prevents an error from being thrown if the trigger you want to drop does not exist.
- ‘name’ refers to the name of the trigger that you want to remove.
- ‘table_name’ is the name of the table that the trigger is associated with.
- ‘CASCADE’ is used to automatically drop objects that depend on the trigger.
- ‘RESTRICT’ prevents the removal of the trigger if there are any dependent objects.
Suppose you have a trigger price_change on a products table that we no longer need, you could use the following command to drop the trigger.
plaintextDROP TRIGGER IF EXISTS price_change
ON products CASCADE;
How to Alter, Disable, and Enable PostgreSQL Triggers
Altering PostgreSQL Triggers
Alteration in triggers involves renaming them or making them dependent on a database extension. Renaming can be useful in cases where the trigger name needs to be more descriptive or has to follow certain naming conventions. Making a trigger depend on an extension can be done to manage complex functionalities that are encapsulated in the extension.
plaintextALTER TRIGGER name
ON table_name
RENAME TO new_name
In this syntax:
- ‘name’ is the current name of the trigger you wish to rename.
- ‘table_name’ is the name of the table the trigger is associated with.
- ‘new_name’ is the new name you want to assign to the trigger.
Suppose we want to rename the price_change trigger to price_update on the products table:
plaintextALTER TRIGGER price_change
ON products
RENAME TO price_update;
Disabling PostgreSQL Triggers
Sometimes, you’d want to temporarily stop a trigger from functioning but not remove it entirely. In such cases, you can disable the trigger. Disabled triggers remain defined in the database but do not activate in response to their triggering events.
plaintextALTER TABLE table_name
DISABLE TRIGGER [ trigger_name | ALL ]
In this syntax:
- ‘table_name’ is the name of the table the trigger is associated with.
- ‘trigger_name’ is the name of the trigger you want to disable. You can also use ALL to disable all triggers on the table.
Let's say we want to disable the ‘price_update’ trigger on the ‘products’ table. Here’s how you’ll do it:
plaintextALTER TABLE products
DISABLE TRIGGER price_update;
Enabling PostgreSQL Triggers
If you have previously disabled a trigger and want to resume its functionality, you would enable the trigger with this prompt:
plaintextALTER TABLE table_name
ENABLE TRIGGER [ trigger_name | ALL ]
In this syntax:
- ‘table_name’ is the name of the table the trigger is associated with.
- ‘trigger_name’ is the name of the trigger you want to enable. You can also use ‘ALL’ to enable all triggers on the table.
Suppose we want to enable the ‘price_update’ trigger on the products table. You can do it with this command:
plaintextALTER TABLE products
ENABLE TRIGGER price_update;
Common Syntax Errors in PostgreSQL Triggers and Fixes
Syntax errors while creating triggers in PostgreSQL can be a headache. You’re trying to get your trigger up and running but something’s off. Perhaps an event is missing or the timing declaration isn't correct. Maybe your trigger function slipped your mind or the return type of your function isn’t quite right. Even referencing ‘NEW‘ and ‘OLD’ incorrectly can cause trouble.
These errors often seem confusing at first but with a little guidance, you’ll solve them in no time. Let’s dig into common syntax errors and how you can fix them:
Forgotten Event
Define an event when creating a trigger, like ‘INSERT’, ‘UPDATE’, or ‘DELETE’. A common error arises when you forget to define this. For instance:
plaintextCREATE TRIGGER sample_trigger BEFORE ON table_name FOR EACH ROW EXECUTE PROCEDURE trigger_function();The event is missing in the above example. Correct it by including an event (‘INSERT’, ‘UPDATE’, or ‘DELETE’):
plaintextCREATE TRIGGER sample_trigger BEFORE INSERT ON table_name FOR EACH ROW EXECUTE PROCEDURE trigger_function();Improper Timing Declaration
When creating a trigger, specify when the trigger should fire: ‘BEFORE’, ‘AFTER’, or ‘INSTEAD OF’. Neglecting to declare this could cause a syntax error. For instance:
plaintextCREATE TRIGGER sample_trigger INSERT ON table_name FOR EACH ROW EXECUTE PROCEDURE trigger_function();To rectify this, specify when the trigger should fire:
plaintextCREATE TRIGGER sample_trigger BEFORE INSERT ON table_name FOR EACH ROW EXECUTE PROCEDURE trigger_function()Missing Trigger Function
Triggers in PostgreSQL call functions when they get activated. If you miss out on defining the function, it will cause a syntax error. Here’s how it will look:
plaintextCREATE TRIGGER sample_trigger BEFORE INSERT ON table_name FOR EACH ROW EXECUTE PROCEDURE ;In this case, simply include the function name:
plaintextCREATE TRIGGER sample_trigger BEFORE INSERT ON table_name FOR EACH ROW EXECUTE PROCEDURE trigger_function();Invalid Function Return Type
For a row-level trigger, the function called must have a return type of ‘TRIGGER’. If the function's return type is incorrect, it will cause a syntax error. Example:
plaintextCREATE OR REPLACE FUNCTION sample_function() RETURNS VOID AS $$
BEGIN
    -- function logic here
END;
$$ LANGUAGE plpgsql;
To fix this, set the function return type to ‘TRIGGER’:
plaintextCREATE OR REPLACE FUNCTION sample_function() RETURNS TRIGGER AS $$
BEGIN
    -- function logic here
END;
$$ LANGUAGE plpgsql;
Incorrectly Referencing NEW Or OLD
In trigger functions, ‘NEW’ and ‘OLD’ are used to reference new and old row values. Mistyping these or using them incorrectly can cause a syntax error. A common mistake is using them in statement-level triggers where they are not available.
To prevent this, make sure you are using ‘NEW’ and ‘OLD’ correctly and only in row-level triggers.
Estuary Flow: A Real-Time Solution For PostgreSQL Change Data Capture
In the realm of data management, triggers are commonly used to add new data as it arrives. However, Change Data Capture (CDC) stands out as a quicker and more efficient approach, which can be implemented using SaaS solutions like Estuary Flow.
Flow is a comprehensive data pipeline solution designed to seamlessly integrate various data sources and destinations using pre-built connectors. The edge it has over typical ETL platforms is its event-driven runtime, which lets it perform CDC in real time.
With the use of Flow's Postgres source connector, you can create a log-driven, real-time CDC pipeline. Once you've configured your database, the Postgres connector takes over and captures change events from the Write Ahead Log (WAL), transferring them to a Flow data collection.
The data stored in the cloud is then streamed through the Flow runtime – an environment built on Gazette’s open-source streaming broker. What you get is a CDC pipeline that ensures your Postgres data collections, automatically backed by a data lake in cloud storage, can be streamed to one or more target systems using any available materialization or destination connector with minimal latency.
Features That Set Flow Apart As A Postgres CDC Pipeline
- Transformations: Flow lets you add transformations directly without the need for an additional tool. This includes operations like aggregations, joins, and stateful stream transformations.
- Customization: Flow offers a high degree of customization, either through its user-friendly web app or the Command Line Interface (CLI). You can add multiple data sources or destinations to your CDC pipeline and combine or separate data streams without the need to directly manipulate the streaming broker.
- Backfills performance impact: Flow minimizes the performance impact of historical backfills, an important aspect of data integrity in CDC. Even though re-reading large tables can cause performance impacts or errors like data duplication, Flow circumvents this issue and writes a checkpoint of where it left off in the source table.
Conclusion
From auditing changes to enforcing business rules, a PostgreSQL trigger simplifies tasks, streamlines workflows, and saves developers valuable time and effort. However, the possibility for errors to slip through the cracks poses a major threat. A poorly coded trigger can unleash chaos, cause data corruption and application failures, and compromise the trust of users and stakeholders alike.
In addition to trigger-based CDC, there are other solutions available for change data capture. One such solution is Estuary Flow, a real-time data pipeline platform that captures changes from PostgreSQL databases, including Postgres Change Data Capture.
Estuary Flow makes exporting a breeze whether you want to export the entire database or only specific tables. With just a few clicks, you can choose the tables you need, start the CDC pipeline, and connect your data to its final destination. It's that simple.
You can sign up for Estuary Flow for free or contact our team to discuss your specific needs.

Author
Popular Articles


