Moving data from Salesforce to Databricks is a smart choice. It offers many benefits.
This process allows you to use Databricks' strong analytics features. Databricks works with many data sources, making it easier to manage different tasks and improve efficiency.
To move Salesforce data to Databricks, you have two options: an automated ETL tool like Estuary Flow or a manual CSV export/import process. The automated method gives you real-time updates. The manual method offers more control but takes more time and effort. In this guide, we will explain both options.
Salesforce: An Overview
Salesforce is a cloud-based platform for managing customer relationships (CRM). It helps businesses handle sales, marketing, customer service, and more. Salesforce offers tools and services to automate and simplify customer management.
Databricks: An Overview
Databricks is a cloud platform for building and managing data analytics at scale. It offers tools for data processing, reports, visualizations, machine learning, and performance tracking. Databricks provides a collaborative, scalable, and secure workspace that allows organizations to fully leverage their data, drive innovation, and confidently make data-driven decisions.
Some of the key features of Databricks are:
- Productivity and Collaboration: Databricks offers a workspace for data scientists, engineers, and analysts to collaborate. It increases productivity with tools like Databricks Notebook, which supports different programming languages (Python, R, Scala). These tools help with exploring and visualizing data.
- Scalable Analytics: Databricks can handle large amounts of data at once. This lets you run complex analytics without slowing down, even as your business grows.
- Flexibility: Databricks runs on Apache Spark and works with major cloud providers like AWS, Azure, and GCP. It is flexible for many tasks, from small projects to large-scale data processing.
Why Migrate Salesforce Data to Databricks?
Moving data from Salesforce to Databricks can improve your data analytics capabilities. Leveraging Data Integration Tools ensures smooth data migration, real-time synchronization, and allows businesses to harness the full potential of their data.
Some key points to note are:
- Databricks offers advanced analytics and AI capabilities. These allow you to build real-time analytics and get insights from your data, leading to faster innovation.
- Unlike Salesforce, which primarily focuses on customer and CRM data, Databricks allows you to integrate data from various sources. This gives you a complete view of your data, which can help you make better decisions.
- Databricks provides a cost-effective pricing model, helping you manage your data analytics costs.
Businesses migrating Salesforce data often choose multiple platforms depending on their use cases. While Databricks is great for big data analytics, platforms like Salesforce to Bigquery and Salesforce to Snowflake offer equally robust cloud solutions for companies looking to optimize real-time data insights and scalability.
Let's explore two ways to seamlessly migrate your Salesforce data to Databricks, starting with the most efficient and automated approach.
Method 1: Using Estuary Flow to Load Data from Salesforce to Databricks
Estuary Flow is a low-code, real-time ETL solution that helps streamline data integration. Unlike manually creating a data pipeline that involves intensive coding and maintenance, Estuary Flow offers an effortless ETL setup process. It's a suitable choice for your varied integration needs to move data from any number of sources into a destination.
You can learn more about capturing historical and real-time Salesforce data through Estuary in this detailed guide.
Here are some of the key features of Estuary Flow:
- No-code Configuration: Estuary Flow provides a choice of 200+ connectors to establish connections between diverse sources and destinations. Configuring these connectors doesn’t require writing a single line of code.
- Change Data Capture: A vital feature of Estuary Flow, CDC allows you to track and capture changes in the source data as they occur. Any update in the source system is immediately replicated to the target system. This real-time capability is essential if you require up-to-date data for decision-making.
- Scheduling and Automation: Estuary Flow provides workflow scheduling options. You can execute the workflows based on the specific time intervals mentioned in the workflow schedule. It also offers automation capabilities to ensure regular data updates and processes for recurring ETL setup.
Here is a step-by-step guide to using Estuary Flow to migrate from Salesforce to Databricks.
Prerequisites
Step 1: Configure Salesforce as the Source
- Sign in to your Estuary Flow account to access the dashboard.
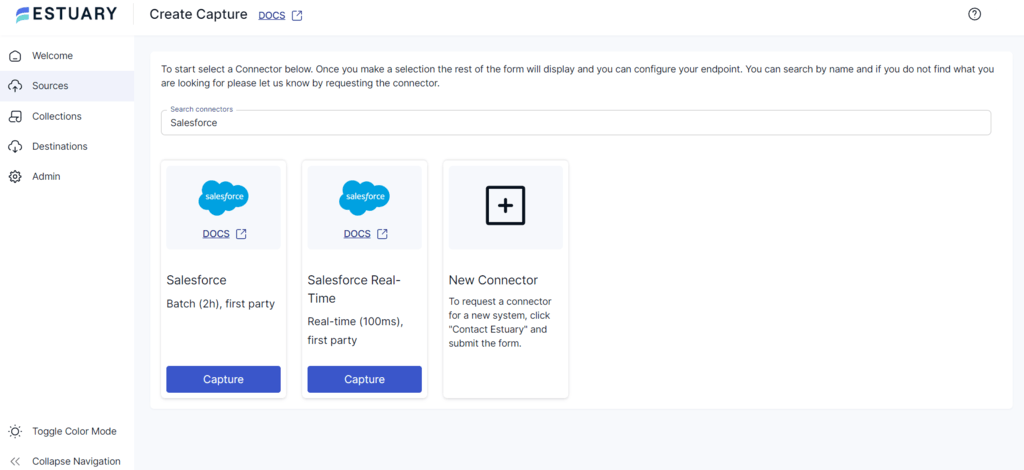
- To configure Salesforce as the source, click the Sources option in the left navigation pane.
- Click the + NEW CAPTURE button.
- Search for the Salesforce connector using the Search Connectors field on the Create Capture page.
- Click the Capture button of the Salesforce Real-Time connector in the search results.
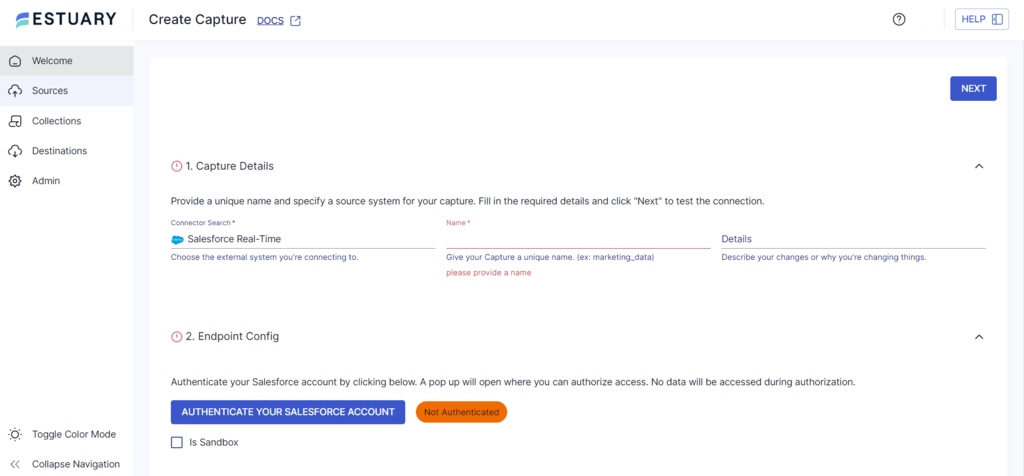
- On the connector configuration page, provide essential details, including a Name for your capture. In the Endpoint Config section, click AUTHENTICATE YOUR SALESFORCE ACCOUNT to authorize access to your Salesforce account.
- Finally, click the NEXT button on the top right corner and then SAVE AND PUBLISH to complete the source configuration.
The connector uses the Salesforce PushTopic API to capture data from Salesforce objects into Flow collections in real-time.
Step 2: Configure Databricks as the Destination
- After a successful capture, a pop-up window with the details of the capture will appear. To set up Databricks as the destination for the integration pipeline, click on MATERIALIZE COLLECTIONS in the pop-up window.
Alternatively, to configure Databricks as the destination, click the Destinations option on the left navigation pane of the Estuary Flow dashboard.
- Click the + NEW MATERIALIZATION button on the Destinations page.
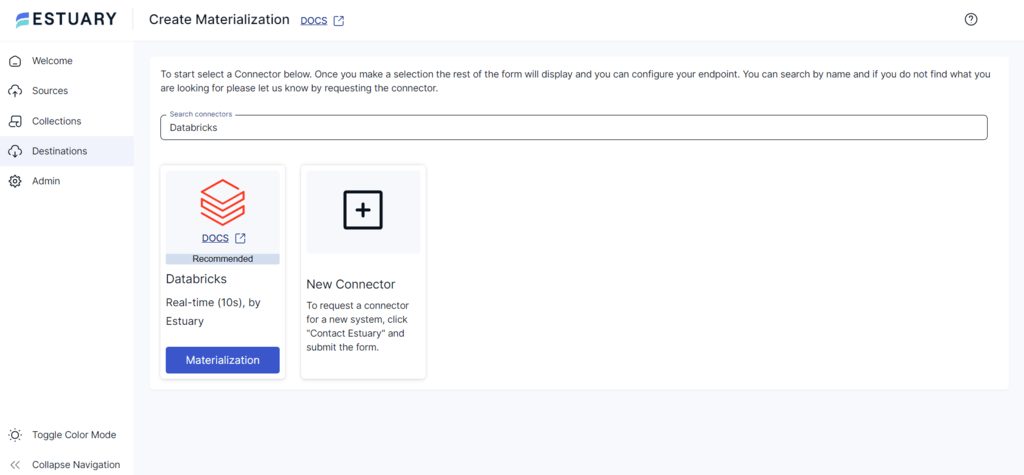
- Use the Search Connectors field on the Create Materialization page to search for the Databricks connector. In the Search results, click the connector’s Materialization button.
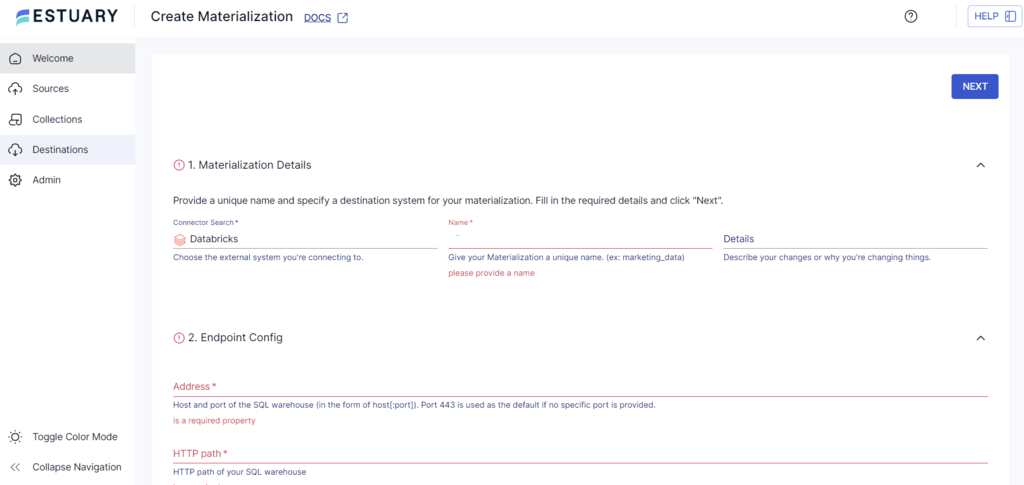
- On the Create Materialization page, fill in the necessary fields, such as Name, Address, HTTP path, and Catalog Name. For authentication, specify the Personal Access Token details.
- Although the collections added to your capture will be automatically included in your materialization, you can manually use the Source Collections section to add a capture to your materialization.
Click the SOURCE FROM CAPTURE button under the Source collections section to link a capture to your materialization.
- Then, click NEXT > SAVE AND PUBLISH to materialize your Salesforce data in Flow collections into tables in your Databricks warehouse.
Ready to streamline your real-time data integration and unlock the full potential of your Salesforce data? Try Estuary Flow for free today and experience seamless Salesforce data migration to Databricks!
Method 2: Using CSV Export/Import to Move Data from Salesforce to Databricks
This method involves extracting data from Salesforce in CSV format and loading it into Databricks. Let’s look at the details of the steps involved in this method:
Step 1: Extract Salesforce Data as CSV
You can export data from Salesforce manually or using an automated schedule. By default, the data is exported in CSV format. There are two different methods to export Salesforce data:
- Data Export Service: This tool lets you regularly export Salesforce data (weekly or monthly) to a safe location outside of Salesforce. You can also schedule automatic backups to keep historical records and recover data in case of loss or deletion.
- Data Loader: Once installed, Data Loader connects to your Salesforce account. It helps you import, export, update, and delete large amounts of data easily. It has a simple interface and supports bulk data tasks, making it useful for managing Salesforce data.
Follow these steps to export Salesforce data using the Data Export Service:
- From there, you can click "Export Now" or "Schedule Export" based on your needs. From there, you can either click "Export Now" or opt to "Schedule Export" based on your needs.
- The Export Now option only exports the data if sufficient time has elapsed since the last export.
- Schedule Export allows you to set up the export process to run at weekly or monthly intervals.
- Select the encoding based on the export file and the appropriate options to include images, docs, and attachments in the export.
- Choose the Include all data option to select all data types for export.
- Click the Save or Start Export buttons to save or export the data. Once you start the export, you will be emailed a zip archive of CSV files.
- The zip files get deleted 48 hours after the email is sent, so click the Data Export button to download the zip file promptly.
Step 2: Load CSV to Databricks
To load a CSV file into Databricks, follow these steps:
- Log in to the Databricks account to access the dashboard and locate the sidebar menu.
- Select the Data option from the sidebar menu and click the Create Table button.
- Browse and upload the CSV files from your local directory.
- Once uploaded, click the Create Table with UI button to access your data and create a data table.
- You can now read and make changes to the CSV data within Databricks.
Challenges of Using CSV Export/Import for a Salesforce Databricks Integration
- Effort-intensive: Manual data export/import requires significant human effort to extract data from Salesforce and upload it in Databricks. This results in a slower migration process and increases the likelihood of errors and data loss.
- Lack of Real-time Capabilities: The CSV export/import method lacks real-time capabilities because each step requires manual effort. Any updations or modifications made to the source data after migration will require manual effort to be synchronized.
- Limited Transformations: The manual CSV export/import method can pose challenges when handling complex data transformations, such as aggregation, normalization, ML feature engineering, and complex SQL queries. Advanced data migration tools are better suited for handling these kinds of operations.
Conclusion
Migrating data from Salesforce to Databricks offers significant benefits, including real-time insights, effortless machine learning, data security, and scalability. To migrate from Salesforce to Databricks, you can use Estuary Flow or the manual CSV export/import method.
The manual method is effective but lacks real-time data integration and is error-prone. Estuary Flow simplifies Salesforce to Databricks integration by reducing repetitive tasks. With over 200 pre-built connectors, you can easily connect data sources and destinations without much effort.
Are you looking to instantly transfer data between diverse platforms? Register for your free Estuary account to get started with effortless integration.
FAQs
- What are some use cases for connecting Salesforce to Databricks?
Some common use cases for connecting Salesforce to Databricks include sales performance analysis, customer segmentation, lead scoring, churn prediction, and marketing campaign optimization.
- Can I perform a real-time analysis of Salesforce data in Databricks?
Yes. You can perform real-time analysis of Salesforce data in Databricks by setting up a streaming pipeline using tools like Estuary Flow, Apache Spark, or Apache Kafka.
- How can I connect Salesforce to Databricks?
There are many methods to connect Salesforce to Databricks, such as Salesforce API or third-party integration tools like Estuary Flow.
Related Guide on integrating Salesforce to other platforms;

About the author
Rob has worked extensively in marketing and product marketing on database, data integration, API management, and application integration technologies at WS02, Firebolt, Imply, GridGain, Axway, Informatica, and TIBCO.
Popular Articles


